Showing posts with label Paint. Show all posts

Wednesday, June 10, 2015

Kitchen Project - Part One

I have been putting off writing this post for so long now!  Not because I don't want to write it, but because it's been such a blur of demo and decisions and kinks and successes that I haven't really been confident in just where to begin.  So instead of putting it off any longer and forgetting details, I am just going to pound it out!

Hubby and I have lived in our home for almost nine years now.  We moved in in August of 2006.  I remember that specifically because we had only moved the basic necessities over (clothes, TV, food) and I took a digger off of a pissy mare's back and broke my hand, so I wasn't able to help move the heavy stuff.  Oops.  Over the years, we have talked about what our goals were as far as updates and that, and every year we have worked to improve our 125 year old home. 

This year, we decided to tackle the kitchen!  I have been dreaming of this one for a long time now.
When we moved in, the kitchen was a terrible shade of dank mint green.  Our first project when moving in initially was painting everything.  And I mean everything. 

So to begin, let me give you a tour of our kitchen as it looked at the start of this project (and has looked for 8 years now).


Yup. Red. And you know what? I freaking still LOVE the red! So much so that I am about 90% sure we are going to keep the red. Those colors were chosen based on the wallpaper border that we tacked up. Say what you want about my red, but I have loved it and I have never second guessed my decision! Here is a look at the south wall without all of the daily clutter.


This wall is definitely the 'hub' of the kitchen. The space itself is very large, but what you see is about all there was for cabinet and counter space! There are two uppers above the refrigerator as well. Counter space is at a premium around here. 

To the left, we have the east wall.  This houses our fridge, stove and the bathroom door.


I began typing something along the lines of 'please disregard the mess' just now with an explanation of why it's messy, but then I said screw it because you know what?  I think it's refreshing when I read other blogs and discover that they don't live in a home décor magazine.

Swinging back over to the right, we have the west wall. 


This wall had room for nothing.  It was only in the last six months or so that my lovely Craigslist table made it's way in just so we had another surface to throw stuff on.  We don't eat there, we just store junk there.  **smiles**  Really I just needed the surface area to put a lot of the counter stuff on so we could get started.  The door leads to a landing that to the right goes down into the basement, or to the left is another door to the outside patio and backyard.


And finally, the north wall.  This wall separates the kitchen from the living room. 


That 'window' there was actually a window in the original house, and the doorway actually lead outside. I never had a huge issue with the wall, as the window opening made it feel like it was a part of the house. But what chapped my rear was the fact that the other side is a long room and the space right on the other side of the wall was probably meant to be a dining room, but only if you had a tiny table. We actually fit a family sized dining table and chairs there for a couple of years in the beginning, but since we never ate there we got rid of it. Then without the table, it was a big empty space that couldn't really be utilized for anything. So I filled it with junk.

But back to the project at hand.
Here is the floor. And Sylvester the cat.
 

Those are square linoleum tiles that were stuck down onto the floor, and none too carefully either. It looks like it's in decent shape in the photos, but in actuality the edges of the kitchen are chipping and peeling up, and nine years of dogs coming and going has made the white impossible to get white again.

You'll also notice around the three sides of the wall, there is tile about five feet up the wall (painted tan). That has been an eyesore to me since the beginning. Additionally, the base of the north and west walls have boiler heating lines, which also aided in limiting what we could put there.

Here is a closer look at our sink.


Those dark streaks are actually marks from pots and pans coming into contact while we wash dishes. It doesn't really come off. Frustrating.

And our countertop.


It's made of this weird plastic laminate and the color has faded down to white in some large spots near the sink. It ran up the backsplash to the bottom of the upper cabinets. The edges of the counters even had aluminum borders! In several attempts at Google searches to find a kitchen redo that began with metal lined plastic counter tops, I found one that was similar. ONE!

One last thing I wanted to add here as I wrap up part one is a mention of the cabinets themselves. Those cabinets, both top and bottom, are full on custom built-ins. As in, they built them on the wall, jimmy rigged some shelving and added sheets of wood and hinges to create doors. Same with all those drawers. They are hand built drawers and they do not slide on rails. They just slide in a hole that was carved there for them, wood on wood.

Now, when I first began dreaming of my kitchen redo years and years ago, the first thing I imagined was taking ole Rhino (my sledge hammer) and going all Hulk on that entire wall of hand built nonsense. So nobody was more surprised than I was when that day finally arrived and I suddenly decided that nobody was going to touch my crooked, chipped, badly painted cabinets! Why did I fight tooth and nail to keep them? I have several reasons, but mostly it boils down to the fact that cabinets in this day and age look cheap to me. Well, at least your big box store options anyways. I hated everything we looked at. The designs in the doors were stupid (very mature of me, no?) So, those babies are staying put!

Stay tuned! We're about to knock some stuff down!

Kitchen Project - Part Two

Peace & Love,
Emily

Tuesday, September 2, 2014

Guest Room Detail

As we work on our guest/spare bedroom, I've been scouring Pinterest and the blogosphere for some fun ideas on things to make it more homey. 

For the past several years (um, eight years) this room has really been a storage/catchall room with a bed buried somewhere within.  It's time to turn it into a real room and get rid of some of our junk!

Today I just wanted to share with you a quick, fun, super cute idea that has been floating around Pinterest lately!  And did I mention it was cheap?

Most folks have Wi-Fi these days and it's common for home owners to share their passwords with friends or family staying with them.  At least I think it is.  We do it.  Currently, our password is written on an old envelope in my husband's lovely chicken scratch and stored somewhere in the office/dog room.  Convenient, right?  No.

Begin by finding a frame from your stash or visiting the dollar store to pick up a cheap one.  I chose this lovely gold frame with the beige and gold matting.  It cost me one dollar.


There are actually two separate mats in this frame. I took it apart and sprayed the frame with white primer, then laid out the two mats and sprayed one a pretty aqua color, and the other gray. I neglected to take photos of that process because... well, because I'm lazy. And I had to make a cheesecake. Which I ate.

While that dried, I jumped on the computer and pulled ideas from several Pinterest projects. Some clip art and some fancy words in Excel and it was ready to print! I used my label maker with clear tape to print the password and placed it where I wanted it, then put it in the frame and voila!


Now guests won't have to watch me wrestle my office into submission while I hunt down the old envelope. I am hanging this guy on the wall in the guest bedroom and they won't even have to ask me for it!

Does Pinterest rock or what? This project could be free if you already have some frames on hand, or you can pick one up at the dollar store and make it any color your heart desires!

Keep Calm & Party On!  Linky Parties!
Someday Crafts Whatever Goes Wednesdays
That DIY Pary at DIY ShowOff!

Thursday, May 15, 2014

The Struggles of a Rustic Color Palette

I've got a bit of a color struggle here.  One of my favorite things to do when I have some down time is to visit all of my other blogger friends out there and see the awesome projects they have been posting or catch up on the latest design/tool/pattern/color trends. 

I see so many things I'd like to recreate in my own home, but one thing stands in my way.  The color struggle.  Our home is not the bright white, clean-line filled with natural light type that is seen on most DIY blogs.  Don't get me wrong, I love that style.  I heart it a lot!  But my husband and I both tend more towards the warm, rustic, north woods theme and with that comes more natural wood, yellow/earthy tones and to make matters worse, the windows that let natural light into the main living space are on the north and south sides of the house.  We all know the best natural daylight is on the east and west!  So there is a lack of that beautiful lighting.  Plus, did I mention that our home was built in the eighteen nineties???


When I see a design method that I want to bring into my own home, I often battle with the color differences.  It just doesn't turn the same result when you don't have the white trim, gray walls and gorgeous natural daylight!  I've got ugly tan carpet (like, the industrial type) and our trim is natural pine (which I LOVE).  The walls were repainted last year in colors that I love, but we're still missing the beautiful daylight. 

Here's what' I'm talking about.  See this incredibly lovely bedroom? 

(via)


It's so beautiful. That striped ottoman, I want to reach into my monitor and take that baby home with me! 
This bedroom perfectly demonstrates what I'm talking about.  Gorgeous lighting, clean lines, and lots of versions of white.  Yes, I certainly could switch over to these colors.  Except I have dogs.  And a cat.  And a hubby who work in the construction industry and does outdoor/fishing activities in his spare time.  White isn't an option.  This gorgeousness isn't an option for me. 

To give you a better idea, here is the basic color palette of our home:


We've also got some sagey greens going on in the living area, however Wordpress decided not to acknowledge the colors I choose and turned them lime green upon loading.  So... yeah.  No lime green here.
I have yet to find more DIY blogs that host the same taste as we do so I can follow along.  But it's a bit of a dance around the internet!

The trending geometric patterns that I see floating around right now are wonderful and I heart them.  (Chevron and Damask are my favorites!)  But they just don't merge that well with black bear, moose and knotty pine. 

I won't give up my search for blogs with similar rustic tastes!  And in the meantime, I'm happy to enjoy the bright white folk, even though I have trouble replicating their gorgeous ideas.

Sunday, May 11, 2014

DIY Bird Feed Seed Can - Tutorial

We are one of those couples who enjoys feeding the birds, especially through the winter.  For the past several years, my feed has been living in the bag we buy it in.  In my kitchen.  Flap folded over, kept closed with a chip clip.

I'll just give you a moment to let that image sink in.

So last trip to Goodwill with my lady Blanche, I grabbed a perfectly squat Christmas tin for 99 cents.


Goodwill rocks.


The feed couldn't live in a Christmas tin of course. (Except it did... for like 6 months until I got around to this project) So, I grabbed my trusty spray paint!


Originally I was going to spray it white, but as I reached for it the pretty blue caught my eye and I thought "hmmmmm". And that's how that happened.

I broke my own rule and bypassed the primer, because I was out of primer and eager to get this done!


So eager, in fact, that I over sprayed and got drippage. Drippage sucks.


Anyways.  Don't judge.
So while that dried, I grabbed the decals I'd had made last fall.


I searched the net high and low for that perfect bird silhouette for my feed can.  The bird that I saw when I pictured the finished product in my head.  I finally found that bird on an Etsy site 'Wilson Graphics' and knew it was the one.  I contacted the owner, explained my idea and he helped me size and customize the decals so that they were perfect for my project!

Once the paint had dried, it was finally time to carefully apply the decals.  And voila!  My dream bird feed can!


For the decals, the can and the scoop I found at the dollar store, this project came in at less than $10! And if you think about it, the peeps at Wilson Graphics sent me a couple of each decal so I could, in reality, make another can to give as a gift. That really puts the total at only about $5 a can.


Keep Calm and Party On! Linking to some awesomesauce parties!

Fishtail Cottage - Tuesday Garden Party!
Funky Junk's Party Junk!
Keeping It Simple Block Party!
Metamorphosis Monday!
IHeartOrganizing Monthly Challenge!
Coming Home: The DIY'ers!
MinettesMaze Sunday Showcase!
A Stroll Thru Life: Inspire Me Tuesday!
Natasha In OZ: Say G'Day Link Party!
Whatever Goes Wednesday!
Daisy Cottage Designs: Off The Hook Link Party!
Seven Thirty Three Blog: Inspire Me Wednesdays!
Chef in Training: Tuesday Talent Show!
Hit Me with Your Best Shot!
Home Stories AtoZ: Tips & Tutorials!
Thrifty Thursday Link Party!
Put A Bird On It: Link'n Blogs!
City of Creative Dreams!
That DIY Showoff!

Wednesday, October 30, 2013

Bedroom Closet - Part 1

Something happened this weekend that I feel a desperate need to share with you.

The closet in our bedroom got sick... and threw up all over my house.


Not that bad? Well, this is a fraction of the overall mess. What is worse is that this went down on Sunday, and now it's Wednesday and I haven't made any progress in sorting through my clothes. 

It's long past time that I did a complete overhaul on my wardrobe, but it's such a huge, overwhelming task that I hesitate to begin. I don't know how!

Then like an angel sent to me from above, I found Laura's 31 Day to Organized Closets.  Just stumbled upon it like a woman lost in the desert stumbles upon a truck carrying gallons of cold Aquafina.  (Sorry, that's the only way I could make you understand!)

Taking advice from her challenge, I was able to finish up the re-do part of my closet and come up with a plan to begin tackling the sorting process that comes next!

So let's back up.  My clothing situation has been pulling at me for over a month now.  I've been throwing clothes everywhere.  During one innocent trip to Wal-Mart, I picked up this $9 hanging shelf thingy in an effort to try and tame the situation.  When I got home, I was excited to hang it up and get started, only to discover that crap was piled so high on the floor of my closet that the shelf couldn't hang all the way down!  It was kind of like trying to paint over a hole in the wall.  It just was not. going. to. work.   

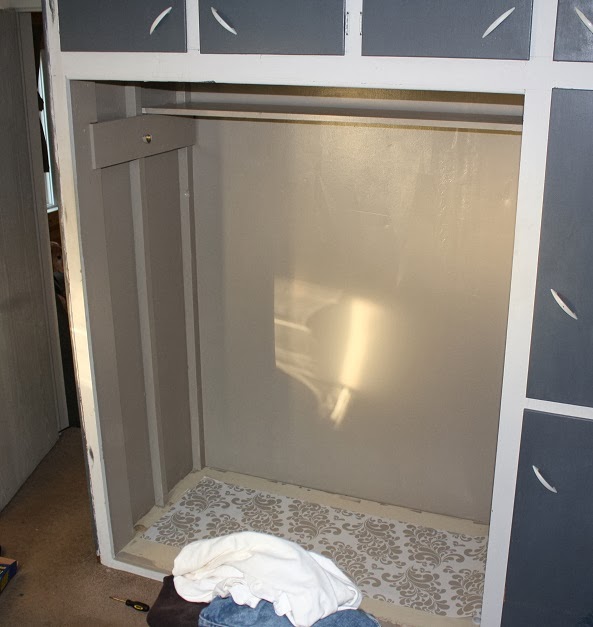
The purging of my belongings from the very tiny space that is our closet held no rhyme or reason.  I grabbed everything I could wrap my arms around and hauled it out of the bedroom.  Here is what it looked like free of, well, everything.   Except the hangy thing that started it all.


I hauled out the same paint and adhesive paper that I used for my Scary Kitchen Sink project and went to work. Two coats of paint later, this is what I had.


The paper was only rolled out by this point so I could decide if I was actually going to use it. I did end up using it, last night after deciding it was time to get my butt in gear. Which means that it's been sitting just like this... since Sunday.

There is one little piece of awesomeness from all of this chaos. There was finally enough of the paint gone that I could ditch the gross, drippy paint can and replace it with a mason jar.


Oh mason jar, how I love thee...